Spiced Rum Sauce

This tantalizing sauce can go on poached fruit, roasts, in BBQ sauce or….my favorite. On my Pumpkin Bread Pudding, recipe found here.

Ingredients:

  • 1/2 cup butter
  • 1 cup cane sugar
  • 2 egg yolks beaten
  • 3 tbls spiced rum

Directions:

In a small pan over medium low heat, melt butter. Add sugar to butter and stir. Turn down heat and stir till melted. Once sugar has melted, ever so slowly add the beaten egg yolks stirring briskly and constantly until thickened. Slowly whisk in the spiced rum, and remove from heat continuing to whisk. Cool slightly (If you want the flavor, but not the alcohol, simply leave pan over heat and cook off the alcohol. About 2 to 3 minutes.) Serve over your favorite food or dessert.

Pumpkin Bread Pudding with Spiced Rum Sauce

I remember the first time I ever ate Bread Pudding. I had gone to dinner with a friend at a fancy restaurant called Micheals. Bread pudding was on the fresh sheet so I ordered it. Since then I’ve been hooked and make it often. I do use store bought bread at times, but why when you can make it so much better. And honestly, you go from good, to GREAT! Find the recipe here.

  • 1 loaf day old french or rustic bread (about 20oz)
  • 1 can or 15 oz fresh pumpkin puree
  • 2 1/2 cup whole milk
  • 6 eggs beaten
  • 2/3 cup brown sugar
  • 1/2 cup granulated cane sugar
  • 1 tsp pure vanilla
  • 2 tsp pumpkin pie spice
  • 1 tsp cinnamon
  • 1/2 cup raisins and or cranberries
  • 1 recipe Spiced Rum Sauce (Optional)
  • Heavy whipping cream or Ice cream

Start by cutting your day old bread into 1 inch cubes. Place in large bowl and set aside. Whisk milk, vanilla pumpkin, sugars, spices and salt together. In separate bowl whisk eggs. Add whisked eggs to pumpkin mixture and combine. Add dried fruit to bread and stir slightly to distribute. Place bread cubes and fruit into a greased 9×13″ baking dish.

Next, pour custard (Pumpkin and milk) over the bread making sure to thoroughly soak each piece of bread. *NOTE You may need to stop and let it sit before adding all the custard. Let stand for 15 minutes. While this is sitting, Preheat your oven to 350°.

Baked pumpkin bread pudding

Bake at 350° for 1 hour or until knife inserted in center comes out clean and top is golden brown.

While the Bread Pudding is baking, make the spiced Rum sauce. Recipe here.

When done let cool a bit.

May be served while still warm or later. Stays for up to a week refrigerated.

Serve topped with spiced Rum sauce and thick whipped cream, no sugar.

I hope you love this recipe as much as we do around here. Let me know if you try this, and as always…. Let’s get cooking!

Kristy

©Copyright 2020 All Rights Reserved

Mushroom Spinach and Sun Dried Tomato Sauce

This is a fantastic bright and flavorful sauce I use on Ravioli, Linguine or a large flat oddly shaped Sagnarelli or Farfalle. Honestly you can use/make any pasta you want. You are the boss of your kitchen 🙂 This recipe is a popular option. Or you can make this dough recipe into what ever pasta you choose. And don’t forget the bread!

Ingredients:

  • 1 package or one recipe of pasta of choice
  • 10 to 12 ounces of mushrooms of choice (I like to use a combination) Sliced or chopped depending on variety
  • 1 bunch fresh Organic Spinach
  • 1/4 sun dried tomatoes chopped
  • 1 Tbls minced Garlic (about 3 to 4 cloves)
  • 3 Tbls Olive oil
  • 1/4 tsp red pepper flakes (optional)
  • 1/8 tsp Cheyenne Pepper (optional)
  • salt and pepper to taste
  • 2 to 3 tbls Parmesan Cheese (Optional) Vegan options available.

Prep: Start by cleaning and slicing your mushrooms. Rinse your spinach water, twice, then lay on towel and toss to dry, or put in salad spinner. Take care not to crush or bruise the spinach. Set aside. Mince your garlic and set aside. In a large, maybe very large 😉 skillet, saute mushrooms in olive oil for about 5 minutes. Add the garlic, pepper flakes, Cheyenne, and sun dried tomatoes, salt and pepper. Saute for an additional 3 to 4 minutes. Add your spinach now to wilt it. You can add your pasta to the skillet now and warm through or if your skillet is full transfer to larger pan before adding pasta.

Serve topped with Parmesan cheese.

I hope you try this pasta sauce and let me know your thoughts.

Enjoy, and Let’s Get Cooking!

Mushroom Ravioli

Pasta is one of my favorite dishes, but because it is loaded with carbs, I don’t eat it often. So when I do, I want it to be AMAZING! So I make it myself, no store bought commercially manufactured pasta here. 🙂

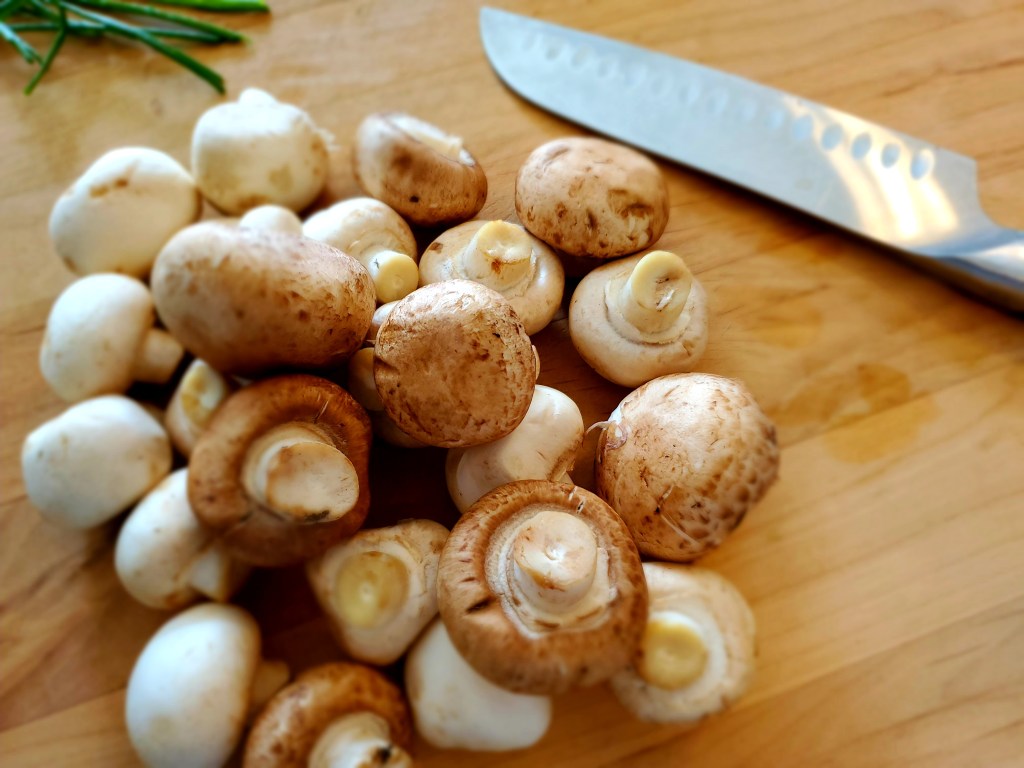
The first thing you wanna do is prep your ingredients for the filling. Start by washing and finely chopping the mushrooms. Then mince the garlic.

In a large skillet saute the mushrooms, garlic, thyme salt and pepper. Saute until the mushrooms have released most of their moisture. About 5 to 6 minutes. add the broth and simmer for 10 to 15 minutes, or until they are tender and the liquid is absorbed. If the mushrooms don’t seem as tender as you would like, add more liquid, but do this one tbls at a time. Remove from heat and cool.

  • 1 lb Mushrooms (Any kind you choose. I like a combo, but mainly use Crimini and baby Bellas)
  • 4 to 6 cloves minced garlic depending on size.
  • 3 Tbls Olive Oil
  • 1 cup Chicken or Vegetable Broth
  • 1 Cup Ricotta Cheese (See *Note if plant based)
  • 3 tsp dried Thyme (You can use fresh, but add 3 tsp more)
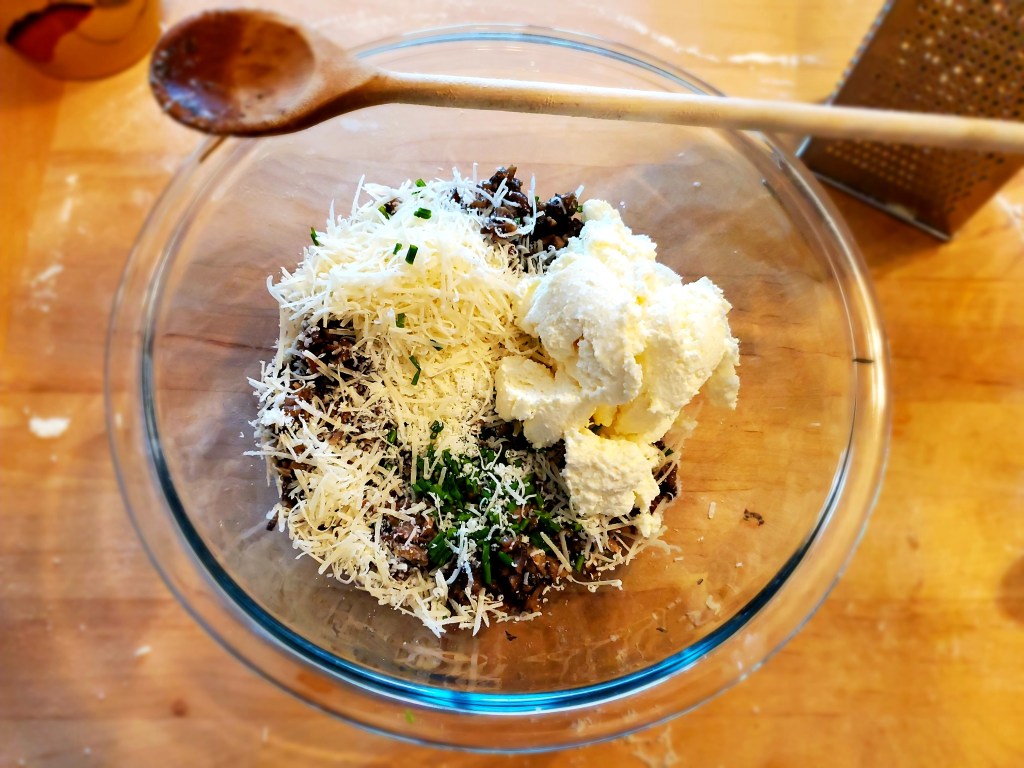
  • 1 Tbls fresh chopped chive
  • 1/2 tsp salt
  • Pepper to taste
  • 1/3 cup plus 1 Tbls finely grated Parmesan Cheese (Plant based options available, see *Note)

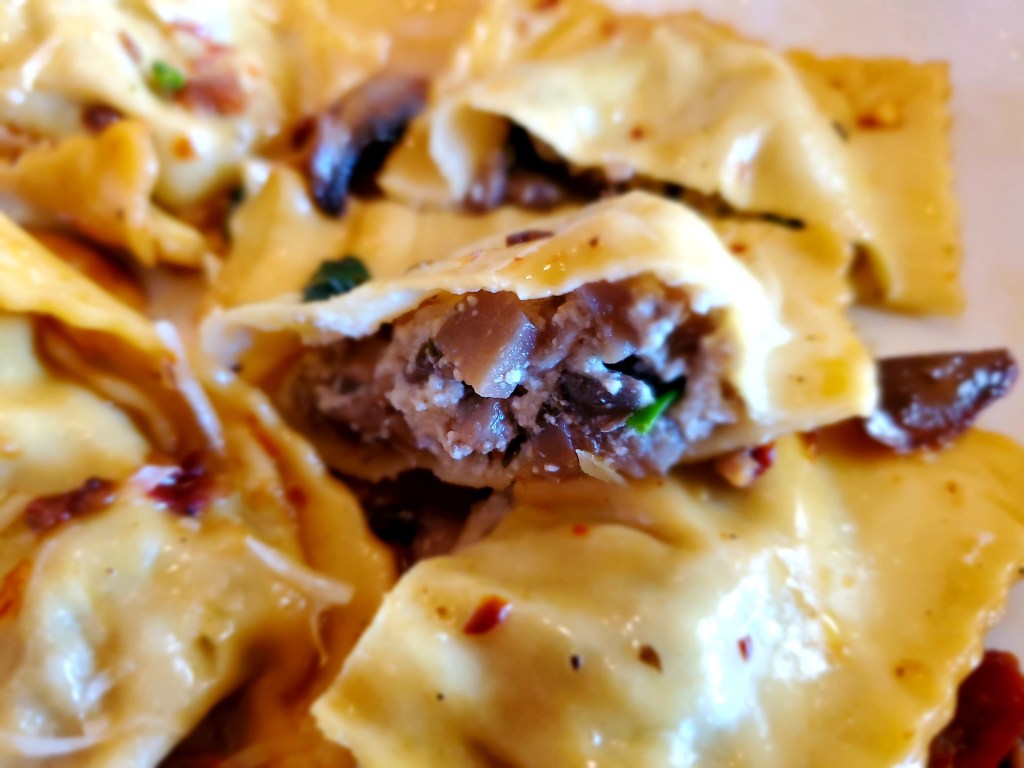
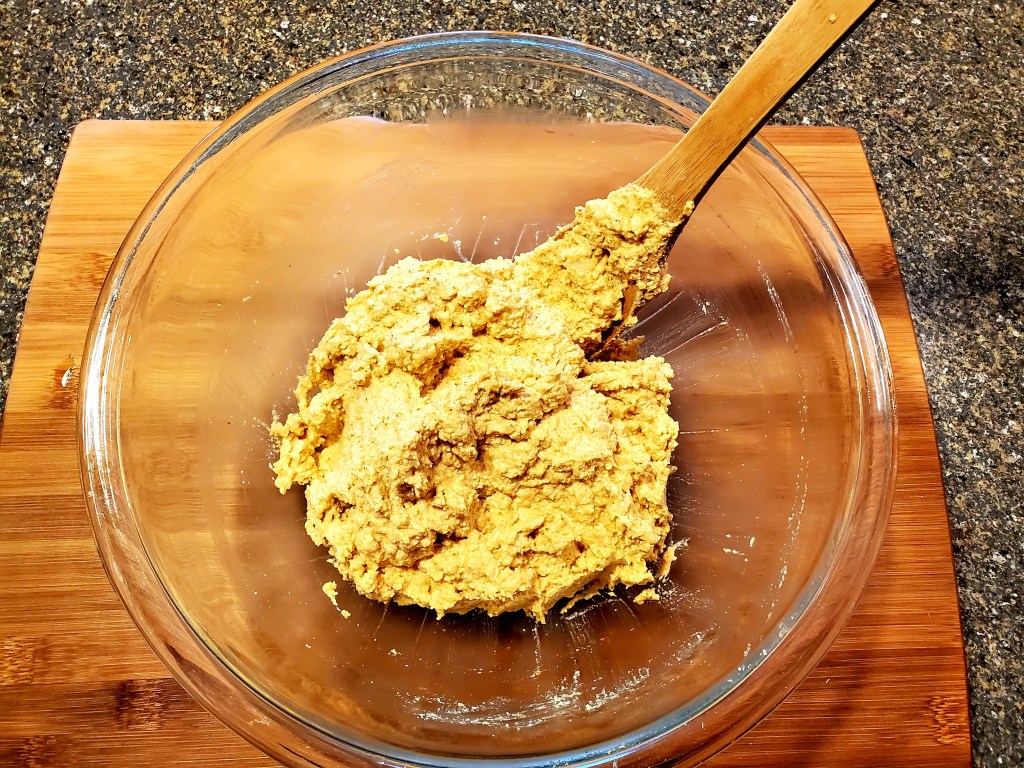
In a medium bowl mix together the Ricotta and Parmesan cheeses * Note If you are plane based, you can buy a Vegan Parmesan (I like Violife) and Ricotta cheese or make this Ricotta without the lemon juice.) If not continue adding chives and the cooled mushroom mix. Refrigerate until ready to use in the Ravioli.

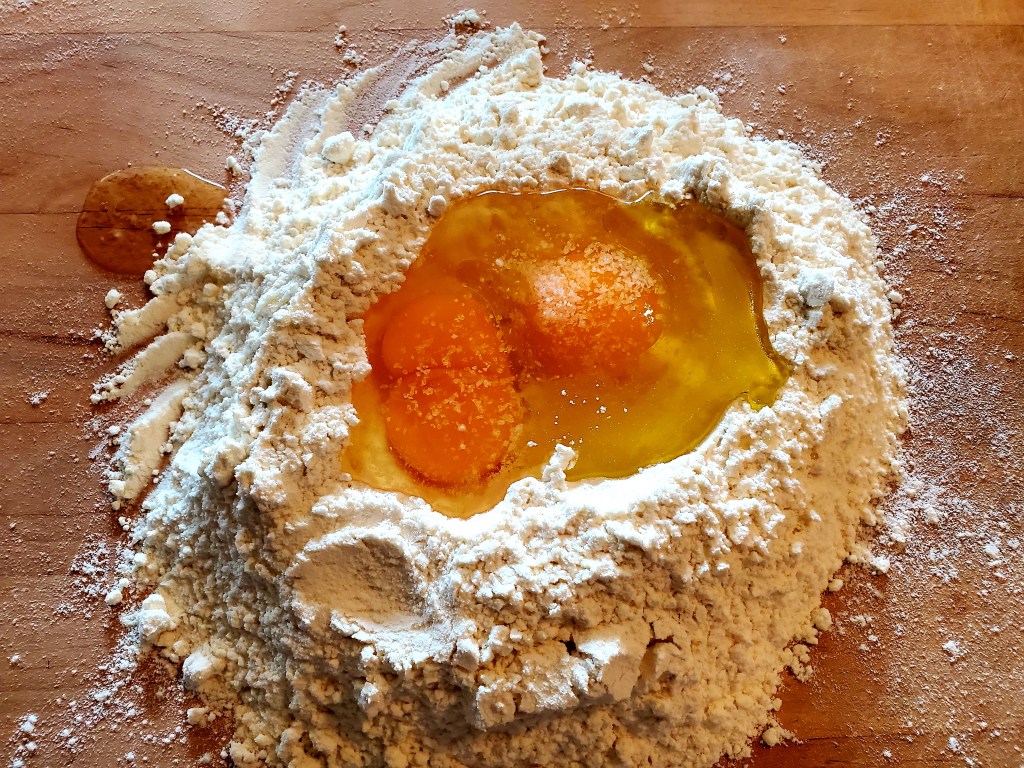
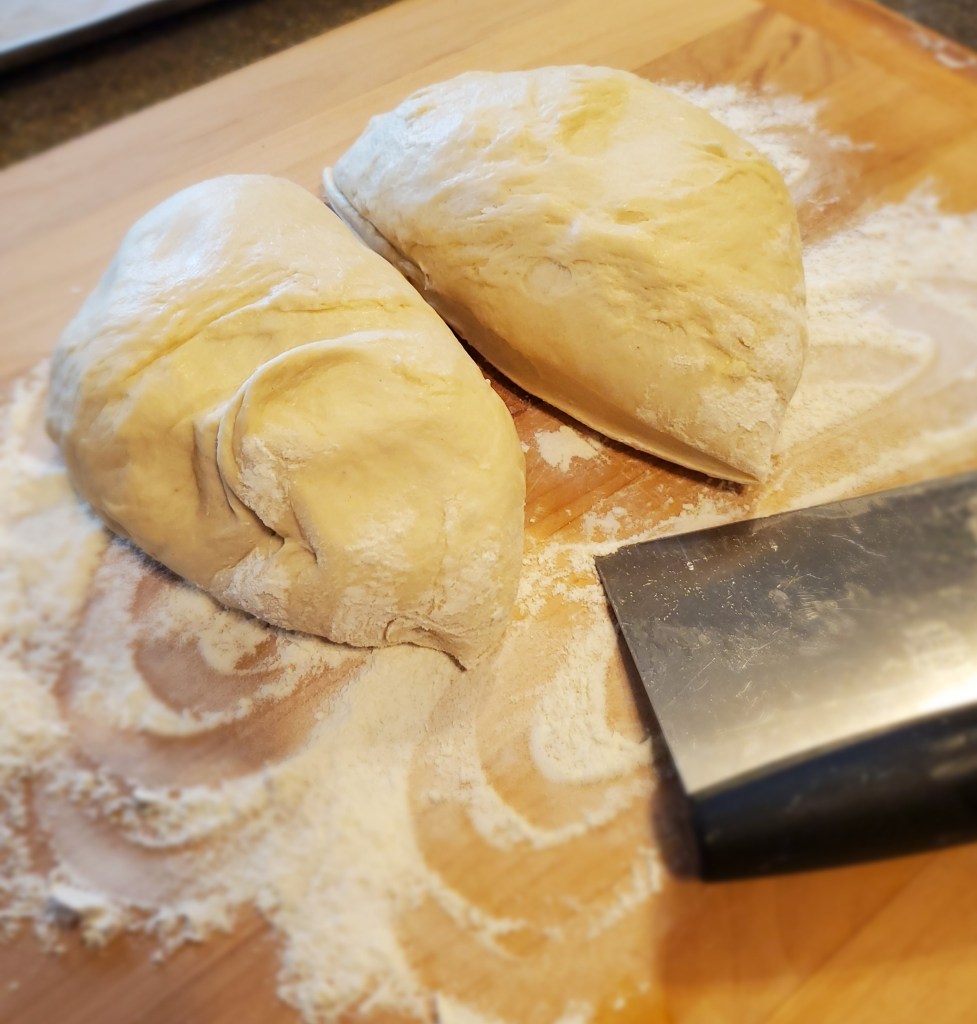
Next make the pasta dough recipe found here. Once the dough has rested roll out the dough. You don’t have to have a pasta roller/machine, it just makes it easier.

I cut my dough in half and roll it into a rectangle. I then feed it through the pasta roller on the thickest setting. I gradually decrease the thickness a couple of times, until the dough becomes about 24 inches long I cut it in half. I then feed it again through the pasta machine, decreasing thickness until the thinnest dough is achieved. You can roll your dough with a rolling pin, just make sure your finished dough is thin, like 1/16, but no thicker than 1/8.

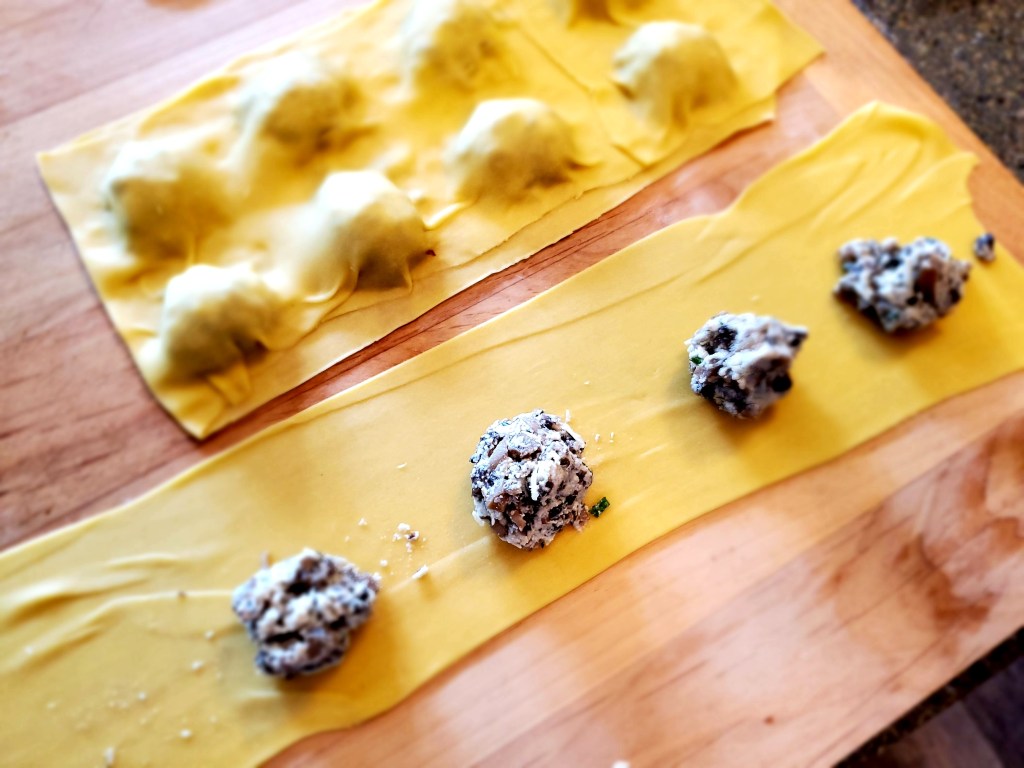
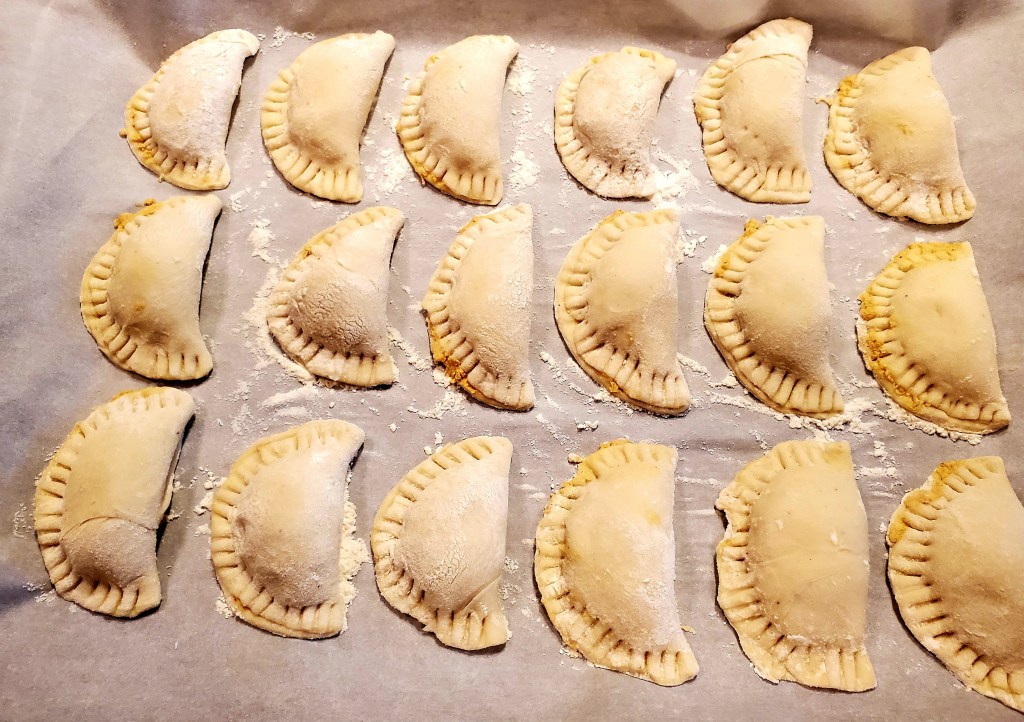
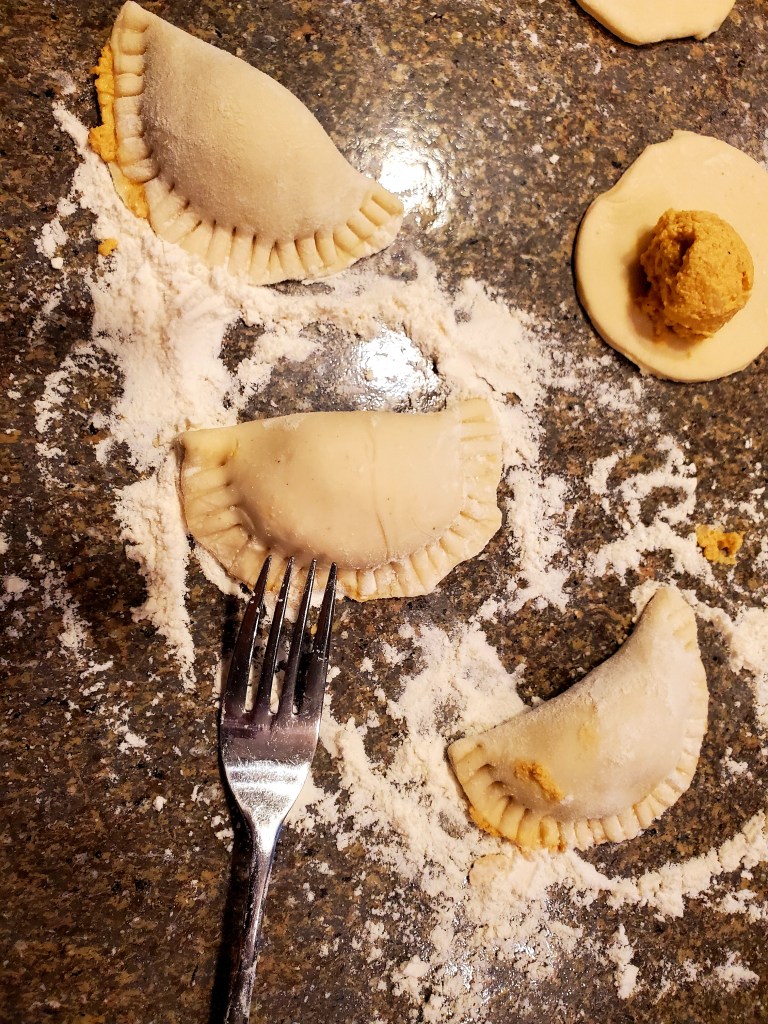
Lay the dough across a floured work surface. Using a tea spoon, scoop a little of the filling onto the dough half way up the length of the dough leaving half empty. Space them just enough apart to be able to seal and cut them. About an inch. *NOTE If you are using a ravioli punch/cutter you may need more space. Fold the empty half over the scoops of filling. Starting on one long side, use your fingers and press all around the filling to seal the ravioli. *TIP It helps to leave one side open to let air that has gotten caught to escape.

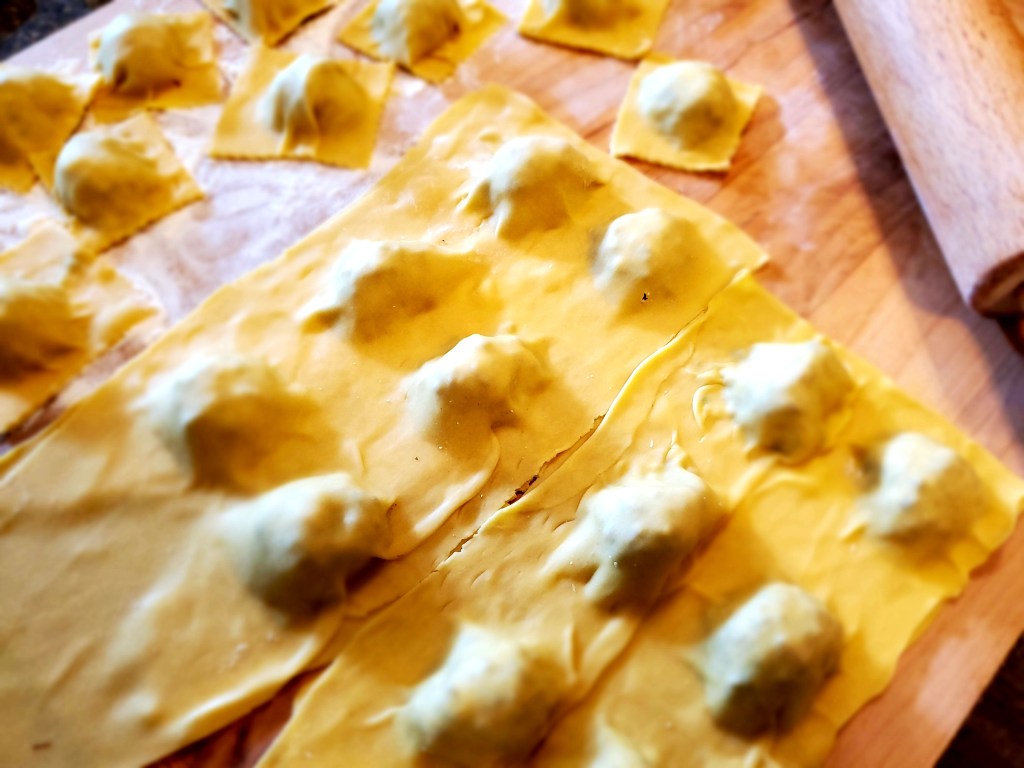
Once the ravioli are filled and sealed, cut them out. You can use a ravioli punch/cutter, but I prefer to use a pasta wheel cutter. (This usually has a straight and a curvy blade) I like the rustic irregular shapes I get. But if you want identical shapes, use a cutter/punch. Place cut ravioli on a floured surface until ready to boil. Or if you are freezing, place on floured cookie sheet single layer and freeze. When frozen, place in ziplock.

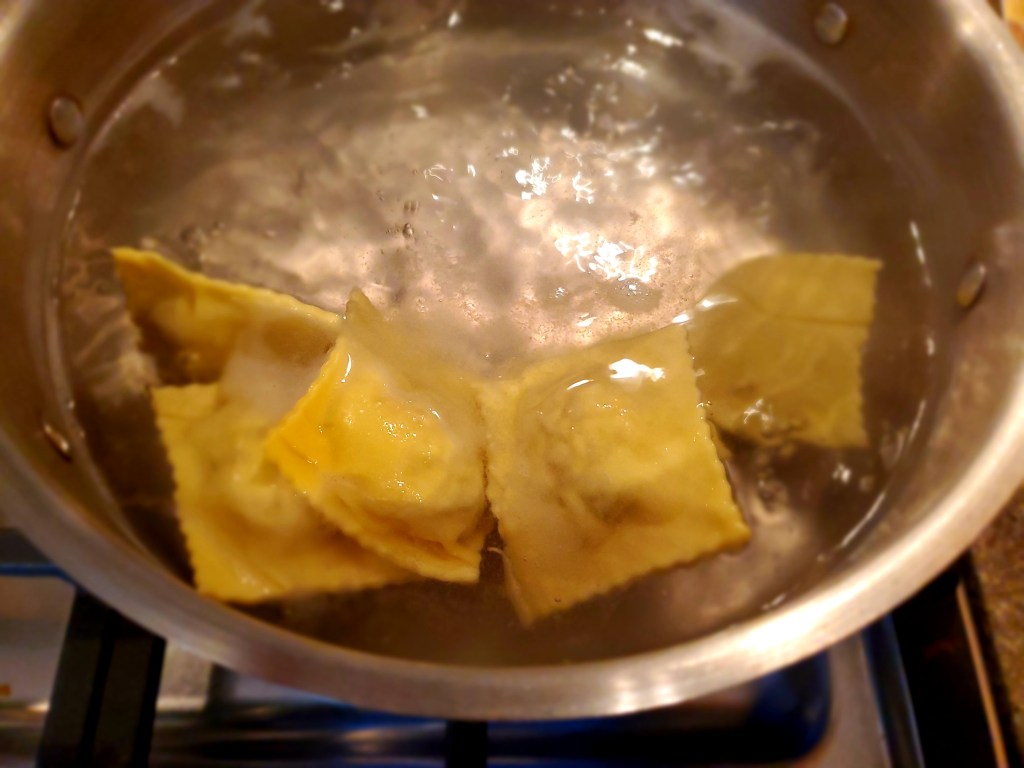
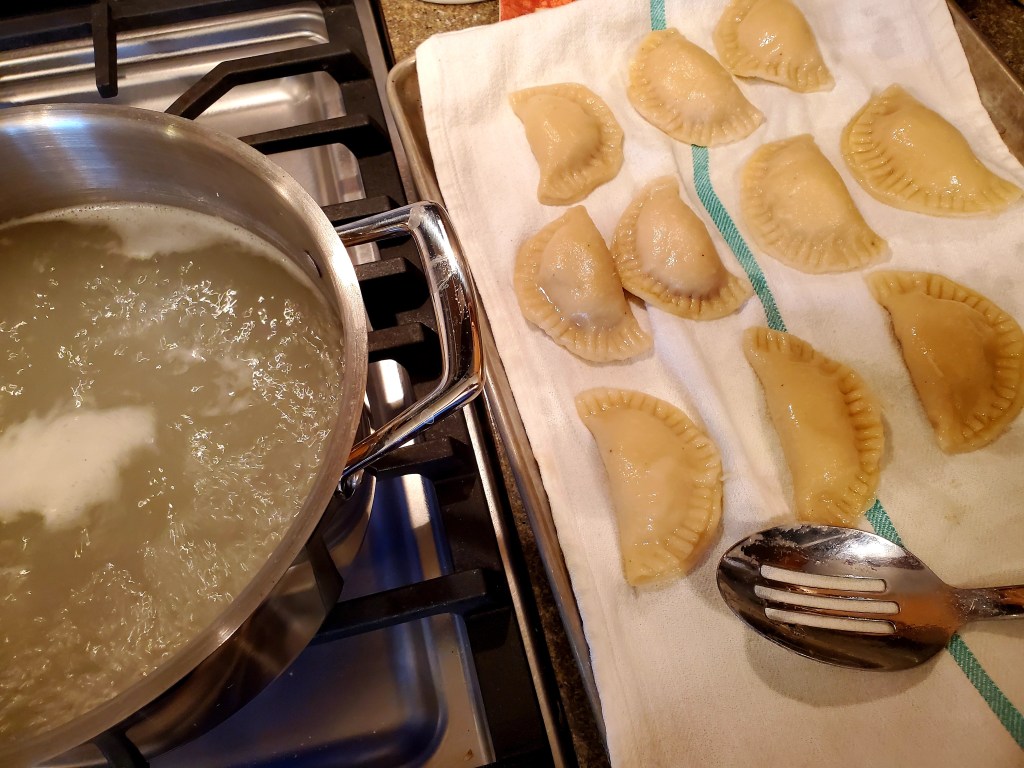
Bring a large pot of water to a rolling boil, turn down just slightly so it’s a medium rolling boil. (You don’t want to knock the stuffing out) Add 6 ravioli at a time to the boiling water. They will let you know when they are done by floating to the top. Using a slotted spoon remove them from the boiling water and place them on a towel lined baking sheet. When sheet is full remove them one at a time and coat with a little Olive oil to keep them from sticking and place them in a bowl until ready to use.

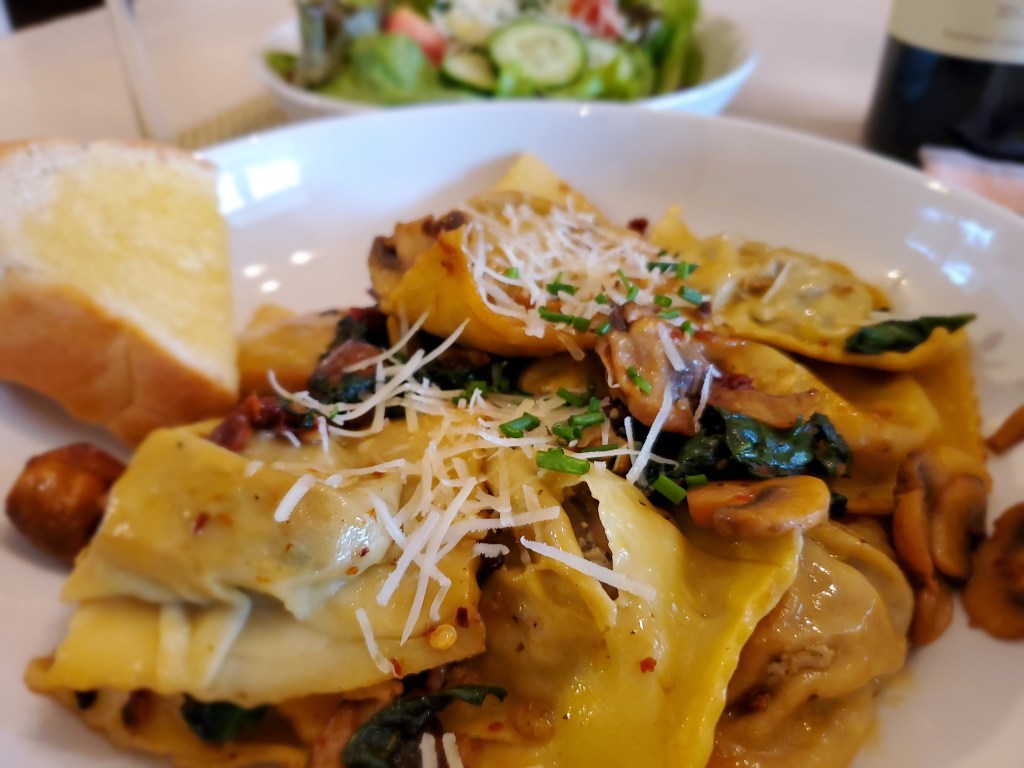
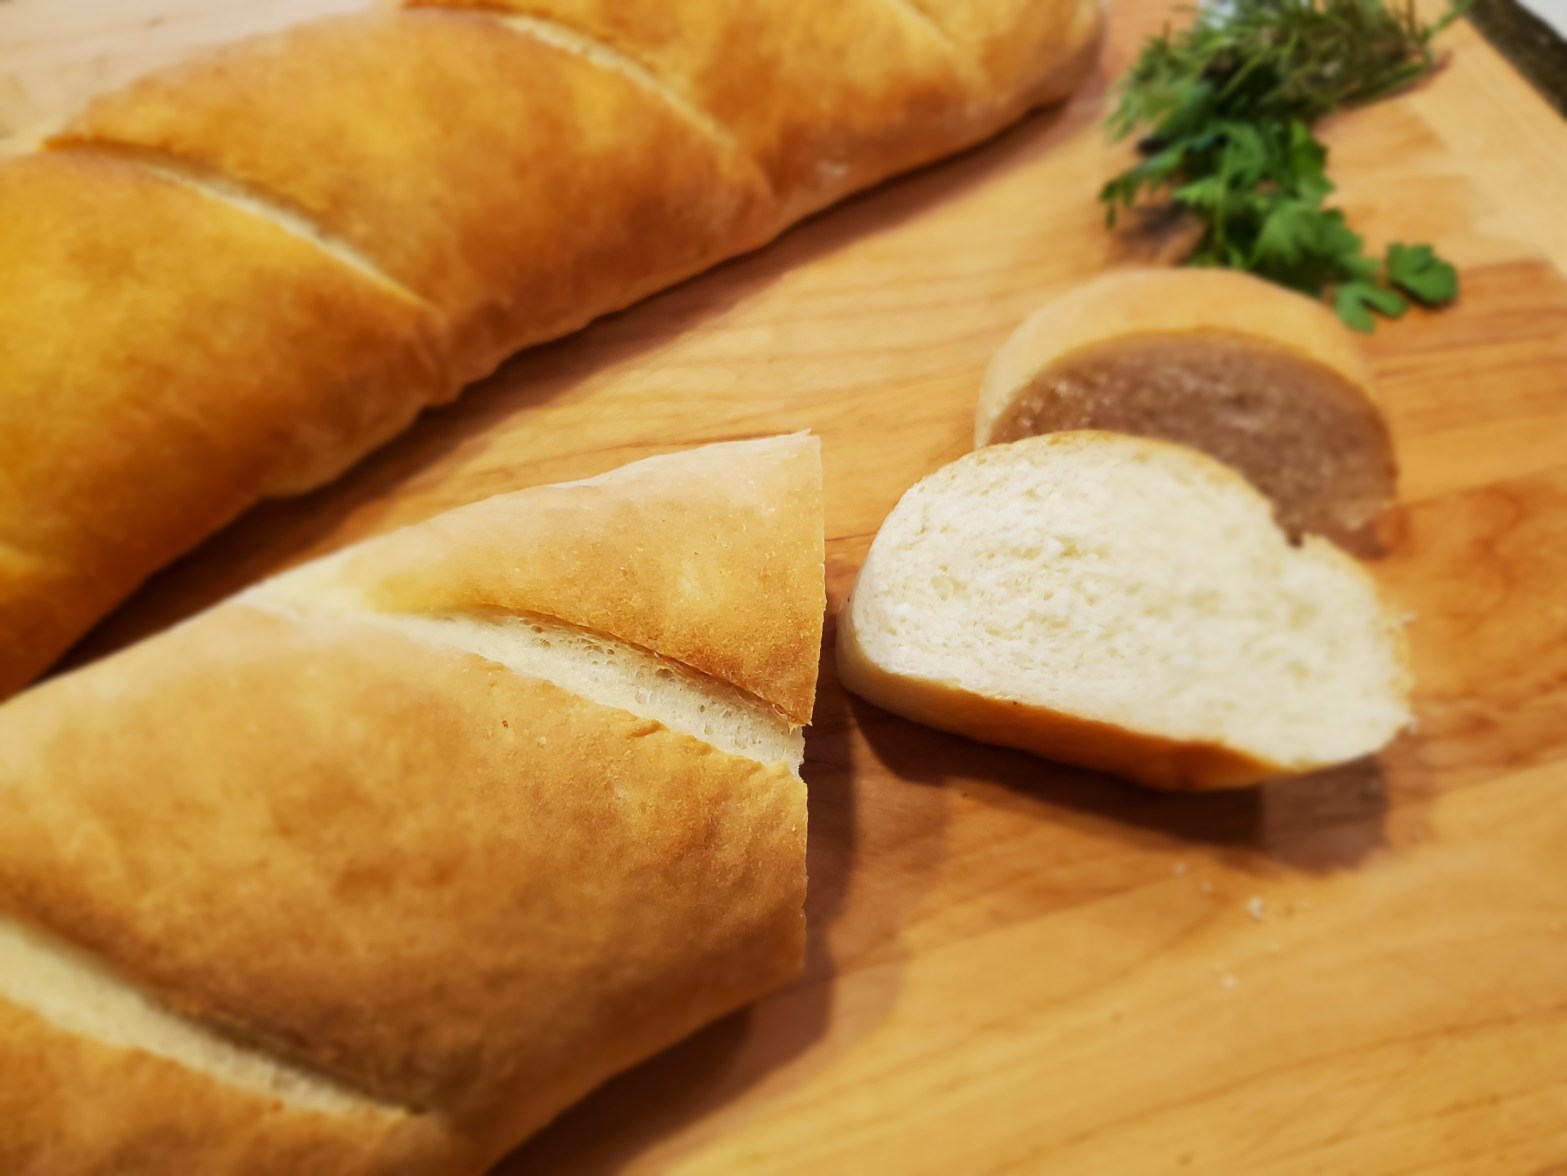
You can top the Ravioli with this mushroom, spinach and sun dried tomato sauce (pictured here) or with your favorite sauce or oil! To complete the dinner, you can also make ahead of time this fabulous french bread recipe or a rustic bread recipe here.

This is one of my all time favorite recipes, and enjoyed by all my guests. I hope you enjoy it, and if you make it, let me know!

Cheers, Kristy

Sources: *The Simple Veganista, *I Heart Naptime

Basic Pasta dough recipe (with egg)

I have made many pasta recipes and they all are very similar, but I usually use this recipe that came with my pasta machine. It always turns out and it’s easy to work with.

I try and use ORGANIC “00” flour. The imported kind from Italy. However, you can use all purpose flour, but please buy Organic or at least Non-GMO. Spruce eats put out a nice article explaining the difference in pasta flours here.

  • 1 2/3 cups flour
  • 2 large eggs (room temperature)
  • 1 Tbls olive oil
  • pinch of kosher salt

Directions: Use a whisk, a sifter or a screened colander to sift flour onto your work surface. Sprinkle salt on flour. Make a well in the center of flour and add eggs and the oil. Using your fingers mix the egg into the flour until the dough is created. If it seems to dry add just a touch of water. Cover and let rest for 15 minutes. It’s now ready for your favorite pasta recipe. Enjoy, and Let’s Get Cooking!

Sources: *The Spruce Eats *A Couple Cooks

Let’s Make Baked Pumpkin Doughnuts

It’s fall, what else can we make with pumpkin? That was a humorous rhetorical question 😉

Well of course, we make doughnuts! I have rarely made doughnuts, in fact I just bought my first set of doughnut pans a little while ago. So I jump on the internet to see what others were doing. I scoured and researched recipes for vegan and traditional baked pumpkin doughnuts alike, until it felt like my eyes were gonna pop out…little drama for effect 🙂 I found a couple you may like. One is vegan, one is not. I will give you my honest opinion and any suggestions I would make regarding the recipes as we go.

For the recipes below I used pumpkin I cooked and pureed (so much better than canned store bought!) And you don’t have to, but please try this recipe and make your own Pumpkin Pie Spice.

Traditional Doughnut Recipe

glazed pumpkin doughnut

The recipe I found for these traditional doughnuts are found at the Food Network.

I followed the directions to a T, The only thing I would change in the recipe is to whip the oil, butter and sugar together, before adding the eggs, pumpkin and vanilla.

ingredients for pumpkin doughnuts

So here’s the thing. Doughnut pans are usually sold in a set of 2 right??? Helloooo, this recipe calls for 3 doughnut pans. 3 won’t even fit in the oven 😀 Ha ha ha. Okay, so my suggestion would be to modify the recipe to make 12 Doughnuts. 3 trays was a bit tricky, even for the equipment I have, let alone the average home.

dozen sugared pimpkin doughnuts

Vegan Doughnut Recipe

Glazed vegan pumpkin doughnut

The recipe I found for these are found at My Darling Vegan.

I made a couple of changes to this recipe. I used vanilla in the batter and only used 2 tsp of baking powder because I personally don’t like the flavor baking powder imparts in my food. And I used 2 1/4 tsp of my own recipe for Pumpkin Pie Spice.

Ingredients to make pumpkin doughnuts

This recipe make 6 doughnuts, but this site gives you the option of increasing your batch. Increase it to 12, walla! I liked the consistency of this dough better than the traditional one. It was far easier to work with.

dozed glazed pumpkin doughnuts

Here are my honest thoughts, tips and tricks. I tried doing what the traditional recipe said and first spooned the dough into the pans. Wasn’t easy and the doughnuts weren’t consistent in size. I had seen where people used piping bags for this. (I had bought some just for this application from Amazon) The piping bag did create a prettier and more consistent doughnut, but the traditional dough was a little messy to work with. (It might get better after you’ve done it a few 100 times 😉 The dough for the vegan recipe was far easier to work with in the piping bag. Both doughnuts have amazing flavor, however the vegan doughnuts did take a little longer to bake and deflated while cooling making them close to a mini doughnut. This isn’t quite a fair comparison though. It’s not like were comparing apples to apples, more like apples to a crab apple. Their the same, but not. If we had made 2 traditional recipes and 2 vegan recipes that might have been a little different. Either way, I will have happy plant based and carnivorous friends!

*Update Both recipes for baked doughnuts should be consumed quickly. The traditional ones fared better than the vegan ones though. I had place both finished and cooled doughnuts in identical airtight containers. They were both a little squishy the next morning, but the vegan ones were more squishy and had reduced in size again. They almost resemble mini doughnuts.

I hope you enjoyed this look at baked pumpkin doughnuts. Please try these recipes and let me know your thoughts.

Chow, and let’s get cooking!

Kristy

Italian Sausage Seitan

One thing I have missed utilizing in my cooking now that I eat mostly plant based, is meat. It really does add a depth of flavor and texture to dishes. The challenge is to get similar flavors and texture from plants. I do not eat soy any longer, so that option was off the table. But then, I discovered Seitan! It truly, oddly mimics meat in texture. The only thing you need to do is add the flavor.

*NOTE If you are Gluten Intolerant or have a IBD, Seitan is NOT an option for you as it is mostly straight up gluten.

I understand the concern surrounding gluten. I do not eat Seitan often, but rather use mushrooms and jackfruit as my meat subs, but sometimes I do make Seitan for certain dishes, like my vegan lasagna or fall Winter Squash & Potato Dish.

Italian Seitan Crumbles

Different kinds of Seitan. If it’s a meat sausage, chances are it has been made into a Seitan sausage as well .There are numerous YouTube videos, chefs and food bloggers with recipes and techniques on how to make different kinds of sausage from Seitan. I n fact, I will be makeing a Seitan pepperoni for pizza!

You can use this basic recipe and add what ever ingredients to make it a chorizo, pepperoni or a bratwurst sausage. You can even make a sausage with an Asian twist if you like. You are the boss of your kitchen 🙂 I however give you the seasoning for Italian sausage in this post.

The first time I used Vital wheat gluten, I did not know what to expect. It was a little weird how it came together. I will give you a few tips as we go.

Ingredients:

  • 1/2 cup vital wheat gluten
  • 1 Tbls nutritional yeast
  • 1 Tbls oil of choice
  • 2 Tbls apple cider vinegar
  • 1 Tbls ketchup
  • 2 tsp maple syrup
  • 1/4 tsp liquid smoke
  • 1 tsp dried basil
  • 1 tsp fennel seeds
  • 1 tsp dried rosemary chopped
  • 1/2 to 1 tsp red pepper flakes
  • 1/2 tsp onion powder
  • 1/4 tsp garlic powder
  • 1/2 tsp salt

Directions: Place all dry ingredients and spices into a medium sized bowl. Next, mix all the wet ingredients in another bowl.

Mixing wet and dry ingredients together in bowl

Pour the liquid over dry ingredients stirring quickly to incorporate. It comes together quickly.

Using your fingers, rip and tear into small bite sized pieces. *Note I use kitchen scissors to cut even smaller.

Cook sausage/Seitan in a fry pan. It does not take long. It is now ready to use for your favorite recipe. It can keep in the fridge for 3 to 4 days.

I like to make ahead and freeze it for later use. This is the perfect way to store it.

Enjoy this recipe in your favorite dish, and let’s get cooking!

Kristy

©Copyright All Rights Reserved

Pumpkin Cranberry Granola

Mornings can be festive as well as the lunches and dinners. Your peeps will definitely love this this Autumn granola recipe. You can have it with your choice of yogurt or milk, atop ice cream or snack on it as is. It’s sure to be a fall favorite.

Start with fresh ingredients. Don’t use those old fashioned oats you have had for months or those cranberries you bought last Christmas. Go buy some new ones. 🙂 Trust me on this one. Hey, you might find another pumpkin you need while you’re out 😉

Ingredients:

  • 3 cups Organic, Rolled Oats (Not the quick kind)
  • 1/2 cup Pureed Pumpkin
  • 1/2 cup Maple Syrup
  • 1/2 cup oil of choice (I like to use organic, expeller pressed Sunflower or Safflower oil for this application)
  • 1 1/2 tsp Pumpkin Pie Spice
  • 1 1/2 tsp Salt
  • 2 Tbls Raw or Brown Sugar
  • 1/2 cup Sliced Almonds
  • 1/2 cup nut of choice. Pumpkin Seeds, Pecans and Walnuts are all good choices, but you can also use Pistachios and Sunflower Seeds. If you are using pecans or walnuts roughly chop them, so they are about in 3rds.
  • 1/2 cup Cranberries (you can find ones unsulfered and sweetened with apple juice)

Directions: Preheat your oven to 350°. In large bowl combine oats, cranberries and nuts. (*If you are using walnuts or pecans, add them when it’s indicated.) In a separate bowl mix together oil, maple syrup, pumpkin, spice and salt. Whisk together till thoroughly combined. Pour half the liquid over oat mixture and stir till combined. Then add the second half and stir till coated well.

Spread granola on a parchment paper lined baking sheet. Bake at 350° for 15 minutes. After 15 minutes take the granola out of the oven and mix it up. scraping in the edges that have gotten more heated. * This is where you add the pecans or walnuts. (They have a tendency to burn, so less time in the oven is Ideal.) Bake second time for 15 more minutes. Take out again. If it still seems a little too moist, pop it back in for another 5 minutes. It burns quickly so watch it! When the granola is cooling, sprinkle with sugar, salt and cinnamon. (Optional) Let cool completely. Place in sealed container or Ziplock to keep it fresh. Can be kept a week or so.

You can serve it with your choice of yogurt, milk, fresh fruit, on top of ice cream or heck, just like it is! Enjoy this recipe and Let’s get Cooking!

Kristy

Pumpkin Potato Perogies

This recipe turned out to be one of my family’s fall favorites. impress your friends and family with this unique and delicious autumn meal. It takes some planning, but with that, you can do it!

If you don’t know what a Perogie is, they are much like a Ravioli, but with no egg in the dough and usually contains potato. Perogies originate from Poland and Ravioli from Italy. Perogies traditionally are served with cabbage or sauerkraut, but hey, there are no rules here. Call them a ravioli and put what ever the heck you want in them. You are the boss of your kitchen 😉

  • One Perogie Dough recipe
  • Sauce, recipe at bottom (optional)
  • 1 cup Ricotta cheese (Recipe if vegan)
  • 8oz/1 cup cooked potato (about 1 large or 2 small)
  • 8oz/1 cup pureed pumpkin
  • 1/2 tsp dried sage
  • 1/4 tsp nutmeg
  • 1/4 tsp ginger
  • Salt and pepper to taste
  • Juice of 1/2 lemon (Not if using Vegan ricotta cheese recipe)

Preparation is key. If you are vegan, you will want to either make this recipe or find a suitable Ricotta cheese. But I highly recommend you take the extra time to make this, you will be so glad you did.

Next you will want to prepare the filling. Start by baking, steaming, boiling or using your Instapot to cook your potatoes. Once cook, let them cool slightly to handle. Peel the potatoes and place them in a large bowl. Mash them. (Mashing works better when Potatoes are hot.) Add pumpkin to the potatoes and all seasonings. *Note If you are using store bought Ricotta cheese, add the juice of 1/2 a lemon here. Stir just to combine. Fold in Ricotta cheese and set aside or place in refrigerator if using later.

Then comes the dough. I tried so many different recipes but found this traditional recipe the best of all.

I use my stand mixer to make the dough. After it has rested for about 10 minutes, roll it out on a floured surface so dough is between 1/8 to 1/4 inch in thickness. Too thin and dough will rip while folding. Thicker dough helps them keep their shape while handling and cooking.

After the dough is rolled out, use a 2 – 2 1/2″ round cookie cutter. You can use a 3″ if that’s all you have, they make a larger Perogie and serving size is reduced. Once you have the circles cut, peel away extra dough. (Be careful not to stretch the dough of the circles) Using a teaspoon, (Not the measuring spoon) Put a scoop of filling on one just about in the middle, but closer to one side. Now fold it in half and press edges together.

If your filling squishes out of the edges, you can reduce the amount of filling for all additional Perogies. (I use a small scoop) Once they are filled and pressed together. go around the out sides with a fork. (This is optional, but ensures Perogies are sealed and it’s attractive!) Place the Perogies on a floured surface or baking sheet as you go (this action stops them from sticking)

Continue till all additional dough is used.

Fill a large pot of water and bring to a boil. Once it is boiling, turn it down a bit so the boil is not rapid, more of a slow boil (We don’t want to knock the stuffing out of our Perogies! :P) Carefully add 4 to 5 Perogies. They are done when they float to the top. Scoop out Perogies with slotted spoon and let dry a little on a towel lined baking sheet. At this point, if you are saving Perogies for later that day or the next, coat each one with oil to ensure they won’t stick and refrigerate till ready to use. If not let’s get frying! You can use a skillet to fry them or use a dutch oven to deep fry. I have done both and like them both, but for this post we are deep frying them. To fry in a skillet directions will be at bottom of this post. If you are using a deep fryer, disregard the following information. Fill a dutch oven about 1/3 full with oil of choice. (I like and use peanut oil.) Heat oil on med to med high heat. Don’t over heat it. You can test the oil by holding a piece of dough and barley dipping it into the oil. if it starts to bubble, the oil is ready.

Frying Perogies

Place 4 to 5 Perogies at a time in oil. Be careful not to get burned, oil will be hot and may splash. Cook for about 2 minutes and using a slotted spoon turn. (You may need the help of an additional utensil to help with this.) Cook on second side for another 2 minutes. If the Perogies are turning dark brown, your oil is a little hot. Take out Perogies with slotted spoon and place on paper towel lined baking sheet to drain away excess oil. When the desired amount of Perogies have been cooked, turn off heat.

You can serve as is, sprinkled with cheese or make a sage lemon or a black pepper sauce. You can find the basics for the sauces here. I like to serve mine with a complimentary side of fall vegetables like fried cabbage or braised carrots. I hope you all enjoy making and eating this recipe as much as we do! Let’s get cooking!

Plate of Perogies with Carrots and apple slices.

*To fry: You can use any non stick skillet you want, but I like a heavy cast Iron skillet. Put enough oil in fry pan so the Perogies don’t stick. Turn after 2 minutes and cook on other side for an additional 2 minutes. Place on paper towels to drain.

Perogie filling recipe: ©Copyright, All Rights Reserved Sources for other recipes: Simple Veganista, Everyday Delisious